How to Make Homemade Dehydrated Chicken Jerky

It’s the 5th month that we are still under Shelter in Place order with limited business reopen. While I am not fully back to provide in-person dog behavior consultation and training, I continue to use this time to improve my knowledge on canine behavior by attending webinars and online workshops. As much as I can read and observe from my canine learning materials, I still need other things to spice up my daily routine which leads me to explore the fun of homemade dog treats.

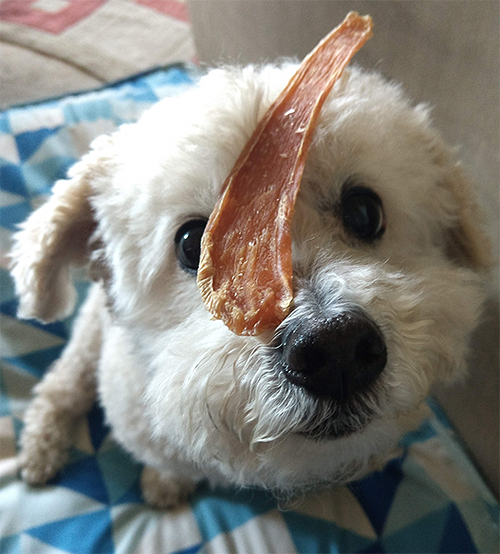
My dog, Bailey, always enjoys homemade treats more than store-bought. Chicken jerky is one of the few items he would eat if I get it from stores. Because of his age (going to be 11 years old in 3 months!) and teeth condition, I notice he doesn’t like store-bought chicken jerky as much as before. He would still eat them but requires the jerky to be cut into small bits for easy chewing. So, I decide to make homemade jerky for him so I can control the thickness and hardness of the jerky.

What you need to make homemade chicken jerky:

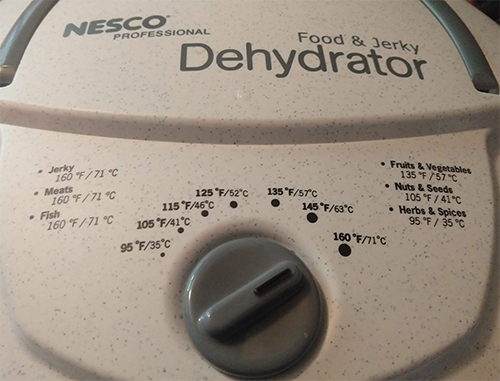
  • A dehydrator (I have this one: Nesco Professional 600W 5-Tray Food Dehydrator, FD-75PR)
  • 2 packs of frozen chicken breasts
  • 8-12 hours drying time depending on the thickness of the meat

You can use pretty much any meat protein that your dog likes to make into jerky. I have tested with beef, chicken, chicken hearts, chicken gizzards, smelts, calamari and squids. I used to get these ingredients from a local Asian supermarket but due to COVID-19, I haven’t been to my favorite Asian supermarket for as long as we are in SIP. Because these proteins are raw, it is recommended to freeze for at least 3 weeks to minimize any potential parasite risks. Store-bought, human-grade meats are pretty safe because most of them are pre-frozen, but I still like to freeze it for 3 weeks before I get it ready for jerky.

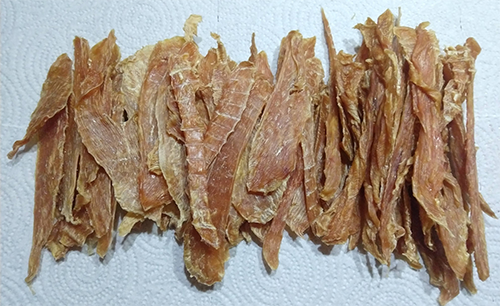
Once the meat is frozen for 3 weeks, I take the meat out of freezer to defrost. While it is semi-frozen, that’s the time to cut the meat into the desirable thin layers. After the 2 packages of chicken breasts are all cut to size, place them on the dehydrator trays with space between each piece. This time, I made some thin chicken chips and chicken twists, just for fun.

Raw chicken pieces are ready for DH~

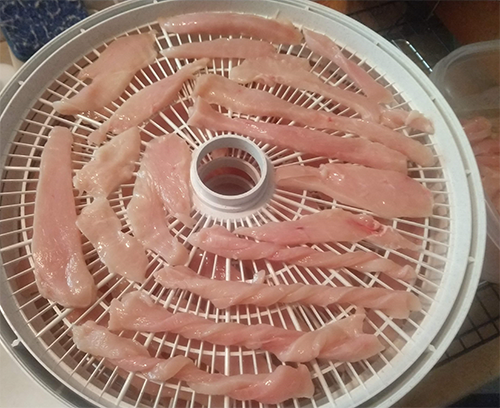
The temperature to dehydrate protein is set at 160° F or 71° C. Depends on how thick the pieces are, it would take at least 8-12 hours for chicken. For oily meat or fish, you will need to keep it for longer time. If you are doing bully sticks, it can go up to 36 hours.

Nesco Professional 600W 5-Tray Food Dehydrator, FD-75PR

So, while the meat is in the dehydrator drying, I have time to listen to quite a few webinars and learned about dealing with dog-dog aggression cases and helping fearful and anxious dogs through play.

After 4 hours in the dehydrator,the meat is already looking like a jerky but still soft in some parts that are thicker.

I kept checking on the meat and finally, they looked DONE after 9 hours!

Chicken jerky & chicken twist

Once the jerky is done, let it cool on a cookie rack for at least 2 hours. Don’t rush to put them into a plastic zip-loc bag or a mason jar while the jerky is still warm. This would make it go rancid quickly.

I like to let the jerky cool off for at least 2-3 hours, sometimes overnight, before I store them in a zip-loc bag or a cookie jar. Since it is a relatively big batch when I make jerky, I usually leave 1/3 of the portion out for a week to use. Keep the 2/3 portion in an air-tight container for up to 6 weeks.

Bailey did a quality control and loved it.

I Spy A Mask!

It’s now April, 2020 and we are in the midst of COVID-19 pandemic. According to World Health Organization (WHO), Coronavirus disease (COVID-19) is a new strain that was discovered in 2019 and has not been previously identified in humans.

However, first human infected case was documented in December 2019, and has since quickly spread to 209 countries with 62,955 confirmed death, as of this blog is written. Check out WHO website for latest updates: https://www.who.int/emergencies/diseases/novel-coronavirus-2019

California has quickly issued Shelter in Place order since mid March in the attempt to flatten the curve. It is also becoming an obvious and safe practice to wear masks when going out to public space.

With more and more people wearing masks and other protective gears, it presents a new scary view to our pet dogs. Our dogs are used to seeing our facial expression. Now, our faces are covered by masks, scarves or other materials, it is an unusual sight to dogs. As we all know, any minute change in the dog’s environment can lead to stress if not properly introduced.

You may start to notice your dog gets more reactive with staring, barking, and lunging toward people wearing masks on your walks. In fact, my dog, Bailey, just barked at a small kid wearing a scarf when we stopped to chat with our neighbors while we stayed at more than 6 feet away!

Knowing that we will see more people wearing facial protection gears, it is important to help your dog understand a person wearing a mask is not scary by doing some desensitization training.

I can be scary looking!

Here are some steps you can try to help your dog get comfortable seeing a person with mask:

Let your dog check out the mask/scarf/bandanna etc first. Start with putting the mask on the floor for your dog to investigate. Every time he shows interest to sniff, paw at it or interact with it, say your positive marker word and reward him with a yummy treat.

Let your dog see you putting the mask on from distance. Next, pick up the mask and try to put it on your face a little ways away from your dog. If your dog isn’t too scared by it, you can do this step closer to your dog. When you put on the mask, while your dog is looking at you, say your positive marker word and toss him a yummy cookie. Toss the cookie behind him if he’s showing some worried signs so he can move away from you and look away from the mask.

Put the mask on and off in front of your dog while keeping some distance. You want to do this step a few more times so your dog understands it is the same you under that mask. Put on the mask, and toss him a cookie. Take the mask off, and toss him another cookie. This way, he learns, that you are playing a game called “cover my face with a mask” with him.

Let your dog get closer to you while you are wearing a mask. Once your dog is pretty comfortable looking at you from a distance, then try to encourage to come closer to you. You can utilize “Find It” by tossing some cookies near your feet or ask for “Touch” if he’s very reliable with this behavior. Don’t forget to mark and reward him when he interacts with you in a close proximity.

Working on “Paws Up on my Arm” while my face is covered.

Do your normal training routine while wearing a mask for a short session. Continue with your normal training routine while your mask is on. Use super yummy cookies to help your dog make a positive association with the mask. This is also a good time to find out if your dog truly understands verbal cue and hand cue since your voice may be muffled by the mask. Remember to keep the training session short to prevent your dog gets worried by the mask being close by.

Reward your dog when he sees a neighbor with mask on from distance. Now that you have prepared your dog with seeing the scary mask on you, it’s time to take the training outside with the view of a stranger. You can do this by just staying at your front yard or drive way while keeping your 6-feet social distance from people passing by. Every time your dog sees a masked person without reaction, say your marker word and give a yummy cookie. You can also use “Find It” or “Touch” to redirect his attention as the masked person getting closer if you are staying in place. “Catch” (catching a treat or toy in midair) is also another good game to redirect your dog’s focus so he isn’t continuously looking at the masked person. If your dog is into play, go for it. Just make sure your dog is secured and doesn’t have an access to get to a stranger.

Reward your dog when he ignores a person with mask. By doing some focus games and play, your dog should be happy to just look at you. The goal is for your dog to think it’s no big deal when a masked person shows up. When you see your dog happily ignore people with masks, don’t forget to tell him “good dog” and give him something he likes. It can be a treat, a toy or a pet, whatever he likes in that moment!

Bailey is being a good sport!

7 Reasons for Crate Training

When I run my orientation for dog training, I always make sure to talk about the benefits of crate. Many people don’t like the idea of a crate because it resembles a doggie prison as dog is locked inside and can’t move around freely.

As a dog trainer, I find crate being an invaluable tool to manage and transport dogs in so many ways.

As a dog owner of a fearful and resource guarding dog, crate has given my dog so much more peace of mind and security.

From my dog’s perspective, his crate is his safe spot and also his sanctuary. When he is inside his crate, no one bothers him, not even me!

Here are my 7 reasons for crate training:

  • A safe spot for a dog. Dogs are den animals. They like to be in a small enclosed area. When they are in their crates/dens, they don’t need to worry about what’s going on outside. They can truly relax and just chill. I always tell my students, everyone has their own space in the household. Men have their men-cave. For me, I like baking, kitchen is my space. For my dog, it’s his crate!
  • A safe carrier for transportation. We have heard so many cases of a dog running loose on a highway or a dog badly injured after a car accident because they were not secured inside a car. When you are driving with your dog loose in your lap or in the back seat, your dog has no protection whatsoever during an accident. We all know it is safe and required to buckle-up our seat belt when we drive, why don’t we do the same to protect our dogs? Keep your dog in a secured crate inside a car would give your dog most protection.
  • A home base for road trips and dog sport events. Many of us have trouble sleeping in a hotel bed because it is something unfamiliar. We may bring a pillow or a blanket from home to help us sleep easily when we travel. Crate serves the same for dogs. It is your dog’s “home away from home”. It is your dog’s “safety blanket”. With a familiar crate and familiar bedding inside, your dog can find the familiar scent in a strange and new location. It will help them settle with ease. If you have a dog who gets anxious and worried in a new location, bringing his familiar crate will help him settle and relax.
  • A great tool to manage a young puppy who is still learning potty training. Dogs often don’t soil their sleeping area except puppy mill dogs. When your pup hasn’t mastered the potty schedule and can’t control his bladder movement, it’s a good idea to keep him in a crate that is just the right size for him. When you can’t keep an eye on your puppy, the crate also lets you manage your pup’s whereabouts inside the house so he can’t just go explore and eliminate behind your back.
  • A safe location to keep your dog out of trouble when you run errands. Most dogs have to learn to enjoy alone time properly. Some dogs get bored and start to rearrange furniture if you leave the house to their own devices. Keeping a dog inside a crate (up to 4 hours a time) can prevent your dog become trouble-maker and destroy your leather couch, your designer shoes or counter-surf on food that may not be safe for dogs.
  • A safe location for a dog who finds dealing with house guests too much of stress. Some dogs love interaction with people but there are some other dogs who find interaction with humans, especially the small humans tiring and stressful. If you have a dog who prefers to be a wallflower during a gathering or party, it’s best that you keep him in his happy place, crate, with toys and chews to enjoy by himself. This way, you get to focus on being a good host and tend to your guests’ needs while your dog is enjoying his rare alone time all to himself.
  • A safe location for a dog during disaster evacuation. California has had a few fire disasters in recent years. As much as we want to be ready to evacuate during fire danger, we want to make sure our pets can come with us, too. Having a crate-trained dog means he/she can come with us when we evacuate to a temporary disaster shelter. If our pets aren’t crate-trained, they would need to go to animal-specific shelter for emergency boarding. Think of the high stress for both people and pets during that time plus being separated from each other. Your pets would have no idea what happened and why they are in an unfamiliar location without you. I’d prefer my dog is with me wherever I go!

A rule of thumb for getting the right size of crate: the size of crate should be big enough so your dog can walk in, stand, turn-around and lay down without hunching his back or purposefully curling up his feet.

Different designs and materials will need to be considered depending on how your dog will use the crate. If your dog knows how to unzip zippers, you may not want to get a soft crate with zipper. If your dog has separation anxiety, a crate may not be the optimal choice when you have to leave him alone.

Never force your dog into a crate. Take the time to introduce a crate to your dog and make the crate the best place to be. Once your dog loves it, you will find him spend more time in it without you asking him to.

After reading these benefits, I hope you are now interested in getting a crate for your dog and start crate training with him!